环境配置方式:🚀 整个过程采用远程的方式,记录树莓派部署
YOLOv5s的过程。
准备:
- 树莓派 5-4B
- 树莓派系统(安装的官方 64 位系统)
- USB 摄像头
# 获取 yolov5s.pt 权值文件
使用的是轻量的 yolov5s 模型,在本地训练后,通过命令发送发到树莓派上:
- 首先查看树莓派地址:
ifconfig # 查看地址 |

连接的 wify,可以看到所属的地址端口。
- 将本地训练好的
yolov5s.pt权值文件发送到树莓派上:
scp yolov5s.pt <用户名>@<树莓派地址>:<保存文件地址> |
# 树莓派环境搭建
本打算参考其他博主的方法,将 pt 权值文件转为 ONNX 再利用 OpenVINO 转为 IR 模型部署到树莓派上。
在本地成功得到 IR 模型后,树莓派配置 OpenVINO 环境加速推理时,遇到问题有点多😤,准备有空再进行尝试。
树莓派中运行 yolov5s 的环境使用 Anaconda 配置和管理,步骤如下:
- 安装 Anaconda
- 创建虚拟环境
- 下载 yolov5 源码
- 安装依赖库
- 安装 Anaconda🌱
下载并安装 Anaconda 以管理 Python 环境,分别在终端执行:
wget https://repo.anaconda.com/archive/Anaconda3-2021.05-Linux-x86_64.sh | |
bash Anaconda3-2021.05-Linux-x86_64.sh |
- 创建虚拟环境并安装 YOLOv5 🌱
conda create -n yolov5 python=3.9 -y # 创建名为 yolov5 的虚拟环境,并指定 Python 版本为 3.9 | |
conda activate yolov5 # 激活虚拟环境 | |
git clone https://github.com/ultralytics/yolov5.git # 克隆 YOLOv5 源码 | |
cd yolov5 | |
pip install -r requirements.txt # 安装 YOLOv5 所需的依赖库 |
# 检测图片
- 运行程序🌱
python detect.py \ | |
--weights yolov5s.pt \ # 没有准备可省略该行,自动下载官方权值文件 | |
--img 320 \ # 指定图片大小,压缩图片,加快检测速度,但是清晰度降低 | |
--source /image/1.jpg \ # 指定图片路径 | |
--device cpu \ # 使用 cpu 进行推理 |
使用的 cpu 进行推理,速度较慢,看资料显示树莓派也是有 GPU 的,但是因为树莓派 GPU 的算力太低,所以还是使用 cpu 进行推理,如果想使用 GPU 进行推理,需要安装 CUDA ,而且树莓派安装 CUDA 比较麻烦。
- 检测效果如下🌱:
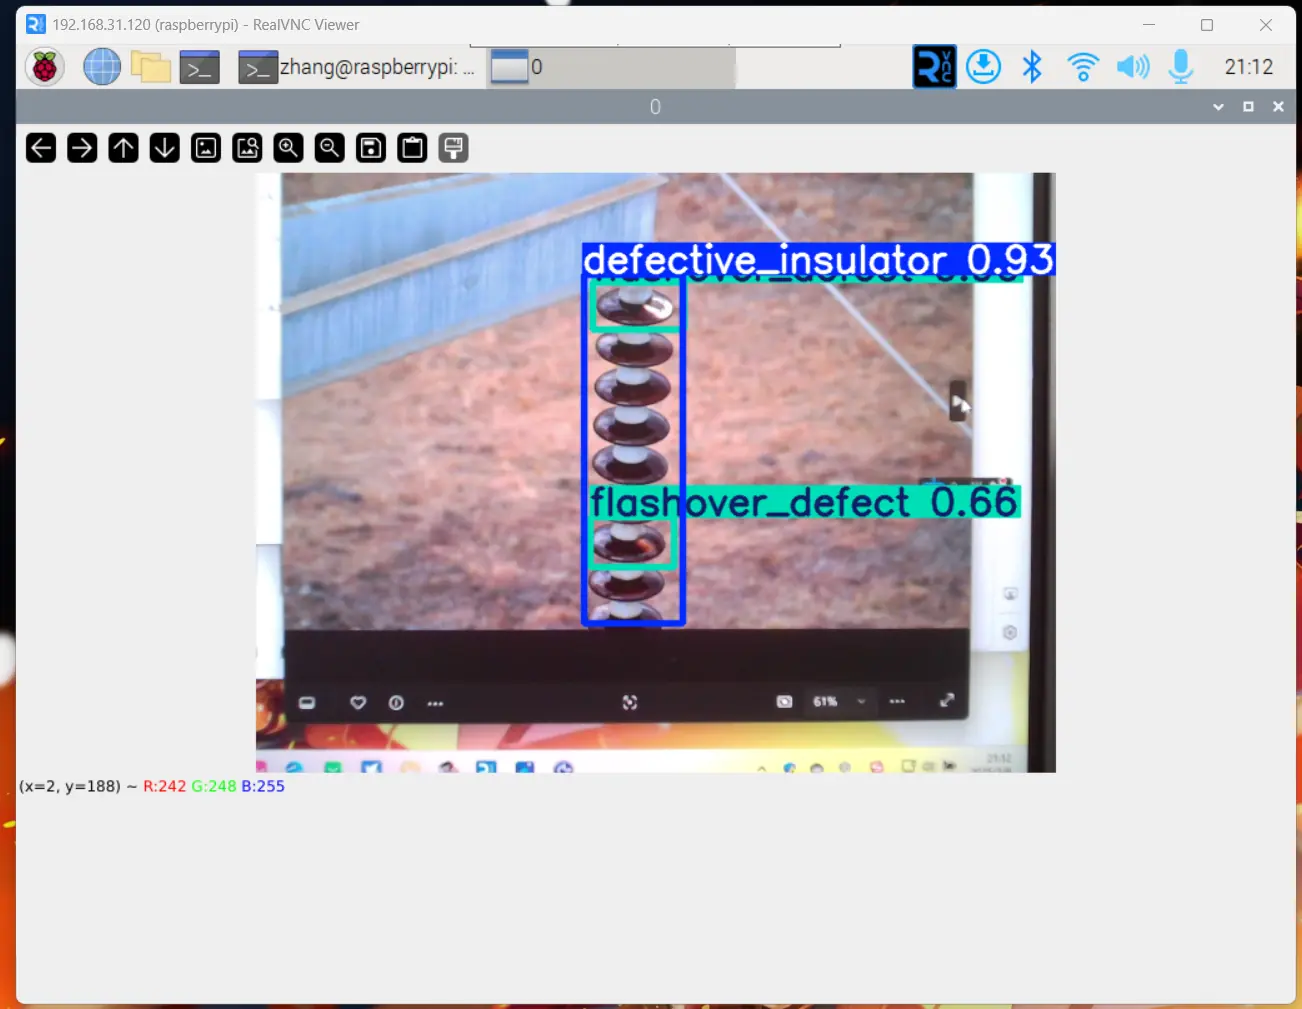
# 开启摄像头实时检测
🍋检测视频流,遇到无法弹出实时检测界面,这让之前的工作毫无成就感😳,之后通过安装 lightdm 来解决的。
lightdm 能够提供图形界面服务,使 OpenCV cv2.imshow() 能通过 VNC 的虚拟显示端口渲染窗口。
- 安装
lightdm🌱
sudo apt install lightdm # 安装图形界面管理器 | |
sudo dpkg-reconfigure lightdm # 绑定显示服务到 VNC | |
sudo systemctl restart lightdm # 重启服务使配置生效 |
- 查看摄像头🌱
使用v4l2-ctl指令查看所有视频设备
v4l2-ctl --list-devices |

可以看到识别到的 USB 摄像头 /dev/video0 、 /dev/video1 ,使用 0 作为 source 参数。
- 运行程序🌱
python detect.py \ | |
--weights yolov5s.pt \ | |
--source 0 \ # 使用摄像头(0 表示第一个摄像头) | |
--view-img \ # 启用实时画面显示 --img-size 320 | |
--device cpu |
- 检测效果如下🌱:
🍀由于树莓派不支持 GPU,所以速度并不快,下面尝试使用 OpenCV 的 dnn 模块进行推理,将模型转为 ONNX 格式,再使用 OpenCV 进行推理,速度会快很多。
# onnx 推理(C++)
# 安装 Opencv
安装 Opencv 参考链接:安装 OpenCV
# 获取 yolov5s.pt 权值文件
将 yolov5s.pt 权值文件转为 ONNX 格式,并导出为 best.onnx 权值文件。
python export.py --weights weights/best.pt --include onnx |
# 编写推理代码
#include <iostream> | |
#include <opencv2/opencv.hpp> | |
#include <opencv2/dnn.hpp> | |
#include <chrono> // 添加时间测量头文件 | |
using namespace cv; | |
using namespace cv::dnn; | |
std::vector<std::string> classes = { | |
"defective_insulator","broken_defect","good_insulator","flashover_defect" | |
}; | |
int main() { | |
// 1. 输入图片路径 | |
std::string img_path = "images/insulator.jpg"; // 输入图片路径 | |
Mat frame = imread(img_path); | |
if(frame.empty()) { | |
std::cerr << "Error: Could not read the image." << std::endl; | |
return -1; | |
} | |
// 2. 加载模型 | |
Net net = cv::dnn::readNetFromONNX("weights/ZJ/best.onnx"); | |
net.setPreferableBackend(cv::dnn::DNN_BACKEND_OPENCV); | |
net.setPreferableTarget(cv::dnn::DNN_TARGET_OPENCL); | |
// 打印模型信息 | |
// std::cout << "Network layers:" << std::endl; | |
// for (int i = 0; i < net.getLayerNames().size(); i++) { | |
// std::cout << net.getLayerNames()[i] << std::endl; | |
// } | |
if (net.empty()) { | |
std::cerr << "Error: Could not load the neural network." << std::endl; | |
return -1; | |
} | |
// 3. 预处理参数设置 | |
const int input_width = 512; | |
const int input_height = 512; | |
float x_factor = frame.cols / (float)input_width; // 修改为动态计算 | |
float y_factor = frame.rows / (float)input_height; | |
// 预处理计时 | |
auto preprocess_start = std::chrono::high_resolution_clock::now(); | |
// 4. 图像预处理(增加 letterbox 处理) | |
Mat resized; | |
int new_width, new_height; | |
if (frame.cols > frame.rows) { | |
new_width = input_width; | |
new_height = (int)(frame.rows * input_width / (float)frame.cols); | |
} else { | |
new_height = input_height; | |
new_width = (int)(frame.cols * input_height / (float)frame.rows); | |
} | |
resize(frame, resized, Size(new_width, new_height)); | |
Mat blob = blobFromImage(resized, 1/255.0, Size(input_width, input_height), Scalar(0,0,0), true, false); | |
//blob.convertTo (blob, CV_16F); // 半精度计算 | |
// 预处理计时结束 | |
auto preprocess_end = std::chrono::high_resolution_clock::now(); | |
// 推理计时 | |
auto inference_start = std::chrono::high_resolution_clock::now(); | |
net.setInput(blob); | |
// 5. 推理后处理 | |
cv::Mat preds =net.forward(); | |
// 推理计时结束 | |
auto inference_end = std::chrono::high_resolution_clock::now(); | |
// 后处理计时 | |
auto postprocess_start = std::chrono::high_resolution_clock::now(); | |
std::vector<int> class_ids; | |
std::vector<float> confidences; | |
std::vector<Rect> boxes; | |
std::cout << "rows: "<< preds.size[1]<< " data: " << preds.size[2] << std::endl; | |
// cv::Mat det_output(preds.size[1], preds.size[2], CV_32F, preds.ptr<float>()); | |
cv::Mat det_output = preds.reshape(1, preds.size[1]); // 避免内存复制 | |
//In a typical YOLO output, the format is [x_center, y_center, width, height, object_confidence, class_score1, class_score2, ..., class_scoreN] for each bounding box. | |
for (int i = 0; i < det_output.rows; i++) { | |
float confidence = det_output.at<float>(i, 4); | |
cv::Mat class_scores = det_output.row(i).colRange(5, 5 + classes.size()); | |
Point class_id_point; | |
double max_class_score; | |
minMaxLoc(class_scores, NULL, &max_class_score, NULL, &class_id_point); | |
int class_id = class_id_point.x; | |
float final_confidence = confidence * max_class_score; | |
// std::cout << "Final confidence: " << final_confidence << std::endl; | |
if (final_confidence < 0.45) { | |
continue; | |
} | |
float cx = det_output.at<float>(i, 0); | |
float cy = det_output.at<float>(i, 1); | |
float ow = det_output.at<float>(i, 2); | |
float oh = det_output.at<float>(i, 3); | |
int x = static_cast<int>((cx - 0.5 * ow) * x_factor); | |
int y = static_cast<int>((cy - 0.5 * oh) * y_factor); | |
int width = static_cast<int>(ow * x_factor); | |
int height = static_cast<int>(oh * y_factor); | |
boxes.push_back(Rect(x, y, width, height)); | |
confidences.push_back(final_confidence); | |
class_ids.push_back(class_id); | |
} | |
std::vector<int> indices; | |
dnn::NMSBoxes(boxes, confidences, 0.6, 0.3, indices); | |
// Draw the final bounding boxes | |
for (size_t i = 0; i < indices.size(); ++i) { | |
int idx = indices[i]; | |
Rect box = boxes[idx]; | |
cv::rectangle(frame, cv::Point(box.x, box.y), cv::Point(box.x + box.width, box.y + box.height), cv::Scalar(0, 0, 255), 2, 8); | |
std::string label = classes[class_ids[idx]] + ": " + std::to_string(confidences[idx]); | |
putText(frame, label.c_str(), Point(box.x, box.y - 10), FONT_HERSHEY_SIMPLEX, 0.9, Scalar(0, 255, 0), 2); | |
} | |
auto postprocess_end = std::chrono::high_resolution_clock::now(); | |
// 输出各阶段耗时(单位:ms) | |
float preprocess_time = std::chrono::duration_cast<std::chrono::milliseconds>(preprocess_end - preprocess_start).count(); | |
float inference_time = std::chrono::duration_cast<std::chrono::milliseconds>(inference_end - inference_start).count(); | |
float postprocess_time = std::chrono::duration_cast<std::chrono::milliseconds>(postprocess_end - postprocess_start).count(); | |
// 计算总耗时(单位:ms) | |
auto duration = std::chrono::duration_cast<std::chrono::milliseconds>(postprocess_end - preprocess_start).count(); | |
std::cout << "预处理: " << preprocess_time << " ms" << std::endl; | |
std::cout << "推理: " << inference_time << " ms" << std::endl; | |
std::cout << "后处理: " << postprocess_time << " ms" << std::endl; | |
std::cout << "总耗时: " << duration << " ms" << std::endl; | |
float fps = 1000.0 / duration; // 计算 FPS | |
std::cout << "FPS: " << fps << std::endl; | |
// 6. 显示结果(取消视频循环) | |
imshow("Object Detection", frame); | |
waitKey(0); // 改为等待按键 | |
return 0; | |
} |